Appearance
Vue Router源码实现
Vue-Router源码结构
- src
- components(组件)
- link.js(RouterLink组件)
- view.js(RouterView组件)
- history(历史管理,VueRouter支持三种模式的历史管理)
- abstract.js(class,abstract模式,服务端渲染支持的模式)
- base.js(History类,三种历史管理的基类)
- errors.js
- hash.js(class,hash模式)
- html5.js(class,history模式)
- util(通用函数)
- index.js(VueRouter类)
- install.js(实现Vue插件)
- create-matcher.js(创建匹配器)
- create-route-map.js(解析路由)
- components(组件)
Vue.use()
官网解释 Vue-use
Vue.use(plugin) 如果是一个对象,必须提供install方法 如果是函数,会被作为install方法,直接调用
该方法在嗲用new Vue()之前被调用,当install方法被一个插件多次调用,只会被安装一次。 Vue.use(MyPlugin, { someOption: true }) 第二个参数是可选参数,是插件的参数
Vue.use(VueRouter) Vue.use是用来注册插件的,它会调用传入对象的install方法
src\core\global-api\use.js —— 源码位置
js
export function initUse (Vue: GlobalAPI) {
  // Vue.use(VueRouter, options)
  // 给Vue挂载了一个方法,传入参数
  Vue.use = function (plugin: Function | Object) {
    // installedPlugins已经安装的插件数组
    // this是Vue,因为是Vue.use
    // 获取Vue的已安装插件的数组,如果没有初始化为空数组
    const installedPlugins = (this._installedPlugins || (this._installedPlugins = []))
    // 判断当前插件在不在数组中,如果已经注册过了就直接返回Vue,这样可以链式编程
    if (installedPlugins.indexOf(plugin) > -1) {
      return this
    }

    // additional parameters
    // 把数组中的第一个元素(plugin)去除,获取剩余的全部参数
    const args = toArray(arguments, 1)
    // 把this(Vue)插入第一个元素的位置
    // install方法的第一个参数是this
    args.unshift(this)
    // 判断插件如果是对象就调用其install方法并把参数传递过去
    if (typeof plugin.install === 'function') {
      plugin.install.apply(plugin, args)  // plugin.install(args[0], args[1])
    // 判断插件如果是函数就调用自己并把参数传递过去
    } else if (typeof plugin === 'function') {
      plugin.apply(null, args)
    }
    // 将plugin加到已经安装的插件数组中
    installedPlugins.push(plugin)
    return this
  }
}VueRouter源码实现
搭建项目结构
- src/my-vue-router里面按照上面的结构先搭建文件
- 在index.js中先实现VueRouter类的基本结构
js
export default class VueRouter {
  constructor (options) {
    // 记录所有的路由规则
    this._routes = options.routes || []
  }

  init (app) {
    // app是Vue的实例
  }
}install方法
- 注册 VueRouter 插件,并给 Vue 根实例,以及每一个子组件对象设置 _routerRoot ,让子组件可以获取到根实例,以及根实例中存储的 _router 对象。
js
// 这里因为传入了Vue的构造函数,为了别的模块方便使用,就记录到一个变量中,这样其他模块就不用每次都import Vue,这样这个模块就不用依赖Vue框架
export let _Vue = null
// install方法会传入一个参数:Vue的构造函数
export default function install (Vue) {
  // 判断插件是否注册过,可以参考源码
  if (install.installed && _Vue === Vue) return
  install.installed = true
  // 将传入的Vue构造函数赋值给变量供其他模块使用
  _Vue = Vue

  // _Vue.mixin方法是让所有的组件和实例都有beforeCreate钩子函数
  // Vue.prototype.xx 这种方式也可以挂载,这种方式是真的给所有的实例添加成员
  // 而下面的mixin方法是给根实例以及所有的组件添加 router 属性,vuex 也是通过这种方式挂载的
  _Vue.mixin({
    beforeCreate () {
      // 给所有 Vue 实例,增加 router 的属性
      // new Vue({
      //   router,
      //   render: h => h(App)
      // }).$mount('#app')
      // 参考这个根实例,因为我们会给根实例添加router,所以以这个作为根实例的判断依据
      if (this.$options.router) {
        this._router = this.$options.router
        // 为了让子组件也可以找到router方法,就设置一个根节点传递this(Vue)
        this._routerRoot = this
        // 初始化 router 独享
        this._router.init(this)

      // this.$parent 和 this.$children都是vue初始化的时候就有的属性
      // 子组件,无法正常获取,那就通过其父组件找到根实例,就找到根实例上面的_router了
      } else {
        this._routerRoot = this.$parent && this.$parent._routerRoot
      }
    }
  })
}- 在index.js中给VueRouter添加install方法
js
// 导入install模块
import install from './install'
export default class VueRouter {
  constructor (options) {
    this._routes = options.routes || []
  }

  init (app) {
  }
}

// 将install方法挂载到插件中
VueRouter.install = installrouter-link、router-view
- 此时创建这两个组件的目的是为了测试
- router-link(创建跳转链接)
js
// 配置组件的选项,要注册成一个全局的组件
export default {
  // 组件名称
  name: 'RouterLink',
  // 参数
  props: {
    // to:跳转的路由地址是什么
    to: {
      type: String,
      // 参数必须
      required: true
    }
  },
  // 里面的内容是变化的所以要用slot,默认插槽
  // template: '<a :href="{{ '#' + this.to }}"><slot name="default"></slot></a>'
  render (h) {
    // 属性选项attrs
    return h('a', { attrs: { href: '#' + this.to } }, [this.$slots.default])
  }
}- router-view(创建模板渲染地址)
js
export default {
  name: 'RouterView',
  render (h) {
    // h() h函数如果没有传参数,那就输出一个空的注释 <!---->
    return h()
  }
}- 在install中将两个组件注册到Vue上
js
// 引入两个模块
import Link from './components/link'
import View from './components/view'
export let _Vue = null
export default function install (Vue) {
  ...
  _Vue.mixin({
    beforeCreate () {
      ...
    }
  })

  // 在全局注册的两个组件
  // 两个参数:第一个是组件名称,第二个是组件选项
  _Vue.component(Link.name, Link)
  _Vue.component(View.name, View)
}这个时候就可以替换vueRouter的代码可以简单运行了。
createMatcher 和 createRouteMap
createMatcher
- 创建并返回一个匹配器,包含 match 方法和 addRoutes 方法
- match 根据路由地址匹配相应的路由规则对象
- addRoutes 动态添加路由规则
createRouteMap
把所有的路由规则解析成路由表
- pathList 是一个数组,存储所有的路由地址
- pathMap 路由表,路由地址 -> record 一个记录(path、component、parent)
遍历所有的路由规则,生成路由表
如果有子路由的话,递归添加子路由到路由表
- 先创建createMatcher的结构
js
import createRouteMap from './create-route-map'
// 导出方法createMatcher,因为要解析路由规则如果把routes传进来
export default function createMatcher (routes) {
// 调用createRouteMap方法,创建路由规则,将参数传入
// 解析完成之后返回一个路由表,一个对象:
// pathList就是路由地址的数组,pathMap是个对象,里面记录了path的相关信息
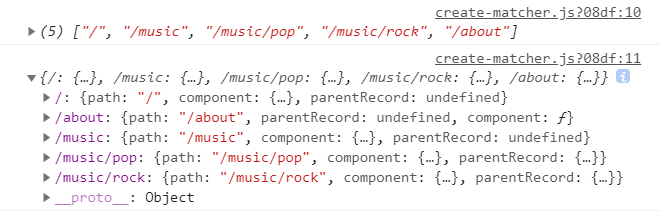
const { pathList, pathMap } = createRouteMap(routes)
// 测试打印
console.log(pathList) // ['/','/music','/music/pop','.music/rock','/about']
console.log(pathMap) // {/:{...},...}
// 匹配函数,根据path路径匹配路由信息的对象
function match (path) {
//TODO
}
// 添加新的路由规则,参数是新的路由规则,要添加到路由表中
function addRoutes (routes) {
createRouteMap(routes, pathList, pathMap)
}
// 返回两个方法
return {
match,
addRoutes
}
}- 在create-route-map.js中创建createRouteMap函数
js
// 形式大概要转成这个样子 routes { path, component, ..... }
// createRouteMap方法,接收一个参数,路由规则
export default function createRouteMap (routes, pathList, pathMap) {
  // 定义pathList,存储所有的路由地址
  pathList = pathList || []
  // 定义pathMap,路由表,路径和组件的相关信息
  pathMap = pathMap || {}

  // 遍历所有的路由规则 routes,因为存在子路由可能需要递归处理,方便处理里面新起一个函数
  routes.forEach(route => {
    addRouteRecord(route, pathList, pathMap)
  })

  return {
    pathList,
    pathMap
  }
}

// 返回一个对象,对象里面记录了路由和组件的映射关系
/**
 *
 * @param {*} route 路由
 * @param {*} pathList 路由列表
 * @param {*} pathMap 路由表
 * @param {*} parentRecord 如果这里有值就是子路由,对应起父路由,如果没有值就是第一层父路由
 */
function addRouteRecord (route, pathList, pathMap, parentRecord) {
  // 将path取出
  const path = parentRecord ? `${parentRecord.path}/${route.path}` : route.path
  // 记录信息变量,并将父路由的信息记录下来
  const record = {
    path: path,
    component: route.component,
    parentRecord: parentRecord
    // ...
  }

  // 判断当前路径,是否已经存储在路由表中了
  if (!pathMap[path]) {
    // 没有记录就开始记录,在数组中加一份
    pathList.push(path)
    // 将record信息存在path对应的值中
    pathMap[path] = record
  }

  // 判断当前的route是否有子路由,如果有children就代表是子路由
  if (route.children) {
    route.children.forEach(childRoute => {
      // 第四个参数如果不写,和其他路由没有区别,没有办法区分子路由和父路由,所以这里要将父路由的参数也加进去
      addRouteRecord(childRoute, pathList, pathMap, route)
    })
  }
}- 在index.js中引入
js
import install from './install'
// 导入createMatcher模块
import createMatcher from './create-matcher'

export default class VueRouter {
  constructor (options) {
    this._routes = options.routes || []
    // 将路由规则进行映射
    this.matcher = createMatcher(this._routes)
  }

  init (app) {
  }
}

VueRouter.install = install测试可以看到现在输出的样子:
目前这样还不是很方便,如何让他更好的找到子路由对应的组件和父路由对应的组件
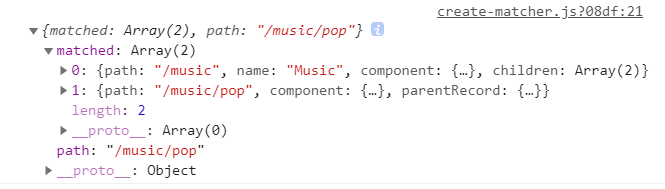
createMatcher -- match
根据路由地址,匹配一个路由数据对象 route { matched, path }
在createMatcher的match方法中进行修改
js
// 具体的createRoute函数在util/route里面实现,这里导入
import createRoute from './util/route'
...
// 匹配函数,根据path路径匹配路由信息的对象
function match (path) {
    const record = pathMap[path]
    if (record) {
      // 创建路由数据对象
      // route ==> { matched, path }  matched ==> [record1, record2]
      return createRoute(record, path)
    }
    return createRoute(null, path)
}
// 测试子路由地址
console.log(match('./music/pop'))util/route.js -- createRoute
createRoute 根据路由地址,创建 route 路由规则对象
- route -->
{ matched: [ musicRecord ], path: '/music' } - 如果是子路由的话,找到他的所有父路由对应的 record 插入到数组的第一项中
- matched 数组中 ->
[musicRecord, popRecord]
在util/route.js里面写createRoute函数
js
// createRoute方法定义两个参数:
// record是对应的信息,path是路由
export default function createRoute (record, path) {
  // 创建路由数据对象
  // route ==> { matched, path }  matched ==> [record1, record2]
  const matched = []
  // 进行循环,判断record是否有值
  while (record) {
    // 第一个record是子路由,matched里面第一个是父路由,所以不能用push方法,要用unshift方法
    matched.unshift(record)
    // 如果有父路由就赋值给record
    record = record.parentRecord
  }

  return {
    matched,
    path
  }
}再进行测试输出:
History历史管理
- hash 模式
- html 5 模式
- abstract 模式(暂不实现)
面向对象的思想,这三种模式都有一些共同的特性,所以抽象出来一个父类History
History 父类
- 属性
- router()
- current(记录当前路径对应的路由规则对象
{path:'/', matched: []})
- 方法
- transitionTo(path, onComplete):跳转到指定的路径,根据当前路径获取匹配的路由规则对象 route,然后更新视图
js
import createRoute from '../util/route'
export default class History {
  constructor (router) {
    this.router = router
    // 记录当前路径对应的 route 对象 { matched, path }
    // 一开始初始化null,path是/
    this.current = createRoute(null, '/')
  }

  // 跳转操作,传入一个path路由,要对当前路径进行赋值操作
  // 初始化的时候要传入一个onComplete回调函数,里面负责去注册路由改变的事件,onhashchange
  transitionTo (path, onComplete) {
    this.current = this.router.matcher.match(path)
    // 有的话就注册,只注册一次
    onComplete && onComplete()
  }
}HashHistory
- 继承 History
- 确保首次访问地址为 #/
- getCurrentLocation() 获取当前的路由地址(# 后面的部分)
- setUpListener() 监听路由地址改变的事件
js
import History from './base'
// 继承父类
export default class HashHistory extends History {
  constructor (router) {
    // 调用父类的构造函数
    super(router)
    // 保证首次访问的时候 #/
    ensureSlash()
  }
  // 获取当前的路径,获取hash,把前面的#去掉
  getCurrentLocation () {
    return window.location.hash.slice(1)
  }
  // 监听路由变化之后跳转到当前路径
  setUpListener () {
    window.addEventListener('hashchange', () => {
      this.transitionTo(this.getCurrentLocation())
    })
  }
}
// 如果初始的时候hash没有值就加一个/,地址变成了 localhost:8080/#/
function ensureSlash () {
  if (window.location.hash) {
    return
  }
  window.location.hash = '/'
}- 在VueRouter 构造函数中初始化 history,根据创建 VueRouter 传来的 mode 决定使用哪个 History 对象
- 我们在首次加载页面的时候要初始化,init里面对一开始打开页面监听事件的方式进行了注册。
js
...
// 引用历史管理
import HashHistory from './history/hash'
import HTML5History from './history/html5'

export default class VueRouter {
  constructor (options) {
    this._routes = options.routes || []
    this.matcher = createMatcher(this._routes)
    // 添加一个mode属性,判断参数中有没有mode,么有默认是hash
    const mode = this.mode = options.mode || 'hash'
    // 通过mode的值加载对应的历史管理
    switch (mode) {
      case 'hash':
        this.history = new HashHistory(this)
        break
      case 'history':
        this.history = new HTML5History(this)
        break
      default:
        throw new Error('mode error')
    }
  }

  init (app) {
    // app 是 Vue 的实例
    const history = this.history
    // 这个setUpListener里面使用对象调用方法的方式将this从window指向history
    const setUpListener = () => {
      history.setUpListener()
    }
    // 一开始就打开当前页面地址
    // transitionTo是父类方法,getCurrentLocation是子类方法
    history.transitionTo(
      history.getCurrentLocation(),
      // 这里原本是 history.setUpListener() 这样使用,但是因为在base中直接调用this指向window,为了解决这个问题使用了另一种
      // 所以在上面定义了一个setUpListener
      setUpListener
    )
  }
}

VueRouter.install = install给 router 对象设置响应式的 _route 属性
上面的代码写完,跳转的时候路由是变化了,current也变化了,但是视图没有发生变化,因为current不是响应式数据,而且current是History的属性,并不是Vue的。
- 在install.js中将 _router 属性变成响应式数据
js
...
export default function install (Vue) {
  ...
  _Vue.mixin({
    beforeCreate () {
      ...
      if (this.$options.router) {
        ...
        this._router.init(this)
        // 给 router 对象设置响应式的 _route 属性
        // this是vue的实例,给vue的实例定义了一个_route,_route是私有属性,所以是下划线开头,外部访问用$toute
        // 这个_route的值是this._router.history.current,如果currnet改变就要重新给_route赋值,_route是响应式的,所以视图也会跟着变。
        // Vue.util这个属性官方说轻易不要用,出问题自己承担责任
        Vue.util.defineReactive(this, '_route', this._router.history.current)
      } else {
        ...
      }
    }
  })
  ...
}- 上一步注册了一个
_route的响应式属性,将current的值赋值。下一步要在current改变的时候,重新赋值给_route才能确保视图更新,所以在base.js中修改History
js
import createRoute from '../util/route'
export default class History {
  constructor (router) {
    ...
    this.current = createRoute(null, '/')
    // 初始化cb属性,这个属性的作用是在this.current变化之后将改变的值传出去
    this.cb = null
  }

  // 定义一个listen函数,给cb赋值
  // 在 transitionTo 中调用,触发回调,给 _route 赋值
  listen (cb) {
    this.cb = cb
  }

  transitionTo (path, onComplete) {
    this.current = this.router.matcher.match(path)
    // 确保cb有值并且将this.current传入
    // 调用 listen 中设置的回调,并且把 最新的 current 传递给 cb
    // cb 中把当前的 current 赋值给 app._route 响应式数据发生变化,更新视图
    this.cb && this.cb(this.current)
    onComplete && onComplete()
  }
}- 在index.js中调用listen
js
...

export default class VueRouter {
  constructor (options) {
    ...
  }

  init (app) {
    // app 是 Vue 的实例
    const history = this.history

    // 因为history.transitionTo要依赖这个listen方法,所以这个在前面调用
    // 接收History类中的this.current传给Vue的实例的_route属性,更新视图
    history.listen(current => {
      app._route = current
    })

    const setUpListener = () => {
      history.setUpListener()
    }

    history.transitionTo(
      history.getCurrentLocation(),
      setUpListener
    )
  }
}

VueRouter.install = install这样,初始化的时候this.current就传给了_route(下划线的是内部属性,外部属性前面加$),当this.current变化的时候调用cb也就是listen的回调函数重新将current赋值给_route,加载组件也就跟着变化了。
$route/$router的处理
install.js 中
js
...
export default function install (Vue) {
  ...
  _Vue.mixin({
    ...
  })
  _Vue.component(Link.name, Link)
  _Vue.component(View.name, View)

  // 给Vue的实例注册$router和$route
  Object.defineProperty(Vue.prototype, '$router', {
    get () { return this._routerRoot._router }
  })

  Object.defineProperty(Vue.prototype, '$route', {
    get () { return this._routerRoot._route }
  })
}router-view--渲染当前组件
- 获取当前组件的 $route 路由规则对象
- 找到里面的 matched 匹配的 record (里面有 component)
- 如果是 /music 的话,matched 匹配到一个,直接渲染对应的组件
- 如果是 /music/pop 的话,matched 匹配到两个 record(第一个是父组件,第二个是子组件)
一级路由的加载
js
export default {
  name: 'RouterView',
  render (h) {
    // 先实现一级路由的加载
    const route = this.$route
    // 获取到里面matched对应的组件
    const record = route.matched[0]
    if (record) {
      return h(record.component)
    }
    return h()
  }
}完成这一步,那首页和about的组件加载就没有问题了。
实现子路由的加载
js
export default {
  name: 'RouterView',
  render (h) {
    const route = this.$route
    // 默认数组访问的深度为0 route.matched[0]
    let depth = 0
    // 下面判断用
    this.routerView = true
    // 父组件
    let parent = this.$parent
    // 如果是子路由,那么组件里面存在父子组件关系,一层一层找,总能找到最顶层的router-view
    // 如果有父组件parent说明当前是子组件,每一个组件的routerView都是true,如果是true就说明是router-view,深度就++
    // 直到找到最顶层的router-view停止
    while (parent) {
      if (parent.routerView) {
        depth++
      }
      parent = parent.$parent
    }
    // /music/pop
    // matched ---> [musicRecord, popRecord]
    // 获取到里面matched对应的组件,这里把数组的个数对应组件深度
    const record = route.matched[depth]
    if (record) {
      return h(record.component)
    }
    return h()
  }
}这样子组件也很好的展示出来了。
模拟导航守卫(钩子函数)
- router 中增加属性记录所有的钩子函数
- 在index.js中增加钩子函数
js
...
export default class VueRouter {
  constructor (options) {
    ...
    this.matcher = createMatcher(this._routes)
    // 增加一个属性,记录所有 beforeEach 注册的钩子函数
    this.beforeHooks = []
    ...
  }

  // 定义 beforeEach 方法
  beforeEach (fn) {
    this.beforeHooks.push(fn)
  }

  ...
}- 在base.js中,在跳转之前执行钩子函数
js
...
export default class History {
  constructor (router) {
    ...
  }

  // 跳转操作
  transitionTo (path, onComplete) {
    // 将current存在一个变量里
    const current = this.router.matcher.match(path)
    // 在页面跳转之前(重新渲染之前),将this.current先传出去
    // 执行钩子函数,传入 to 和 from
    this.router.beforeHooks.forEach(hook => {
      hook(current, this.current)
    })
    // 改变当前的current
    this.current = current
    ...
  }
}- 在router/index.js初始化VueRouter的时候定义钩子函数
js
// 路由对象
const router = new VueRouter({
  routes
})

// 定义钩子函数
router.beforeEach((to, from) => {
  console.log('beforeEach', to, from)
})在跳转之前,可以看到控制台有属性记录输出