Appearance
Docker使用
安装 Docker
参考文档
安装步骤
下面演示 Centos 中的安装步骤,其他系统中可以参考文档
- 删除旧版本的 Docker
bash
yum remove docker \
                docker-client \
                docker-client-latest \
                docker-common \
                docker-latest \
                docker-latest-logrotate \
                docker-logrotate \
docker-engine- 添加可以获取到 Docker 的源
bash
dnf config-manager --add-repo=https://download.docker.com/linux/centos/docker-ce.repo

dnf config-manager \
    --add-repo \
http://mirrors.aliyun.com/docker-ce/linux/centos/docker-ce.repo- 安装 Docker 社区版
- CentOS 8
bash
yum install https://download.docker.com/linux/fedora/30/x86_64/stable/Packages/containerd.io-1.2.6-3.3.fc30.x86_64.rpm
# docker 有两个版本,一个是ce,社区版免费,一个是ee,企业版,收费
yum install docker-ce docker-ce-cli- CentOS 7
- 安装依赖项
bash
yum install -y yum-utils \
  device-mapper-persistent-data \
lvm2bash
yum install docker-ce docker-ce-cli containerd.io- 启动和停止 Docker
bash
systemctl start docker
systemctl stop docker
# 开机启动
systemctl enable docker
# 立即运行并开机启动
systemctl enable --now docker- 跑一个 Hello world
bash
docker run hello-world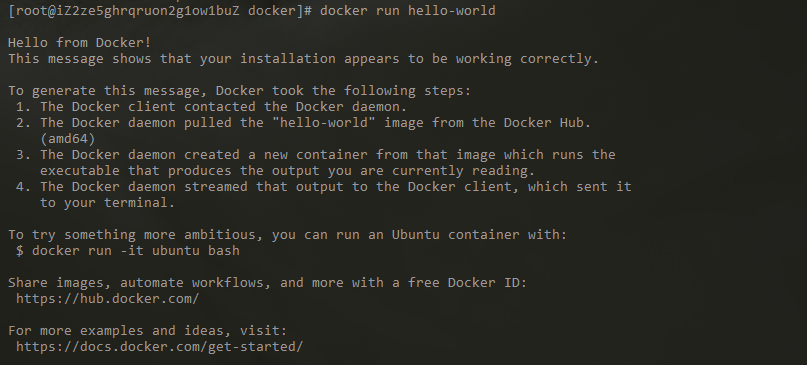
这里面做了四件事情:
- The Docker client contacted the Docker daemon.
Docker client 连接 Docker daemon
- The Docker daemon pulled the "hello-world" image from the Docker Hub.
如果本地没有镜像,就从 Docker Hub 拉取'hello world'的镜像
- The Docker daemon created a new container from that image which runs the executable that produces the output you are currently reading.
Docker daemon 基于拉取的镜像创建一个容器
- The Docker daemon streamed that output to the Docker client, which sent it to your terminal.
Docker daemon 将容器中的应用执行的结果发送给 Docker client,并打印到终端
- 运行Yapi
bash
docker run --rm -d -p 40001:3000 jayfong/yapi:play
# 默认的管理员账号:admin@docker.yapi,管理员密码:adm1n

打开网页 http://59.110.231.59:40001/ 可以看到Yapi启动起来,因为是play版本无法注册,使用默认的管理员账号登录。

镜像加速
Docker 获取镜像的时候,默认从 Docker hub 获取,服务器在国外所以国内下载会很慢,我们可以设置成国内的镜像地址,类似于 npm
- 参考文档
- 常用的国内镜像地址
- 获取镜像的时候,指定地址
bash
docker run hello-world --registry-mirror=https://docker.mirrors.ustc.edu.cn

docker run hello-world --registry-mirror=https://almtd3fa.mirror.aliyuncs.com- 配置中设置镜像地址
- 在 /etc/docker/daemon.json 文件中设置以下内容
{"registry-mirrors":["https://almtd3fa.mirror.aliyuncs.com", "https://registry.docker-cn.com"]}- 重启服务
bash
systemctl daemon-reload
systemctl restart dockerDocker 基本使用
看看docker中如何操作镜像,如何操作容器?
Docker 镜像使用
- https://www.runoob.com/docker/docker-repository.html
- 通过 Docker Hub 网站查找镜像
Docker Hub中可以找到别人帮我们做好的镜像,想要什么镜像到这里找,比如想要搭建一个自己的gitLab,去网站搜索github,这两个图标是官放镜像,CE是社区版(免费的),EE是企业版(收费的)。
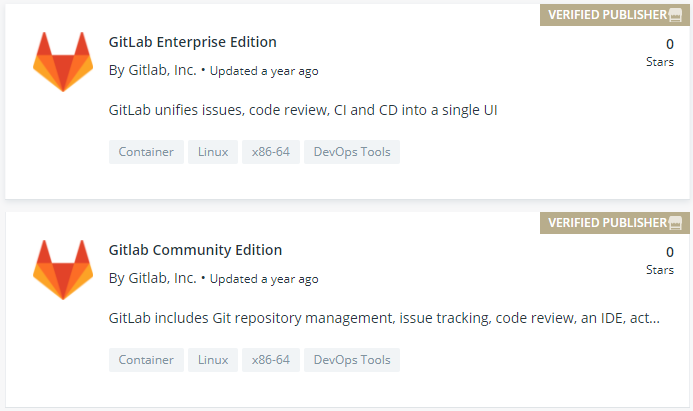
这个和npm类似,可以下载别人写好的镜像,也可以自己基于一个配置写一个自己的镜像发上去让别人使用。
查找镜像
- 通过 Docker Hub 网站查找镜像-https://hub.docker.com/
- 命令窗口中使用
bash
# 在 Docker Hub 查找镜像
docker search nginxbash
# REPOSITORY 镜像名称
# TAG 版本
# IMAGE ID 镜像的唯一标识
# CREATED 镜像创建的时间
# SIZE 镜像大小
[root@... docker]# docker images
REPOSITORY     TAG       IMAGE ID       CREATED         SIZE
nginx          latest    f6d0b4767a6c   41 hours ago    133MB
jayfong/yapi   play      5806462a805f   6 months ago    396MB
hello-world latest bf756fb1ae65 12 months ago 13.3kB- 常用命令
bash
# 在 Docker Hub 查找镜像
docker search nginx

# 查看本地镜像
docker images

# 获取一个镜像
# 如果指定镜像版本 centos:latest, 默认就是最新版本
docker pull centos

# 删除镜像
docker rmi hello-world

# 如果容器正在使用,可以强行删除
docker rmi -f f6d0b4767a6c

# 为镜像设置一个新的 tag
# image id -> 860c279d2fec
# 镜像的用户名 -> lfz
# 镜像名称 -> centos
# tag -> dev
docker tag 860c279d2fec lfz/centos:dev4.tag
- 创建tag
bash
docker tag hello-world hu77/hello-world:v1.0可以看到,docker镜像里面有一个hello-world的tag,id是一样的
bash
[root@iZ2ze5ghrqruon2g1ow1buZ docker]# docker images
REPOSITORY         TAG       IMAGE ID       CREATED         SIZE
jayfong/yapi       play      5806462a805f   6 months ago    396MB
hu77/hello-world   v1.0      bf756fb1ae65   12 months ago   13.3kB
hello-world latest bf756fb1ae65 12 months ago 13.3kB- 删除tag
bash
docker rmi hu77/hello-world:v1.0bash
ker images
REPOSITORY     TAG       IMAGE ID       CREATED         SIZE
jayfong/yapi   play      5806462a805f   6 months ago    396MB
hello-world latest bf756fb1ae65 12 months ago 13.3kB容器使用
用镜像开启一个容器,有不同的使用方式,不同的镜像指定的参数也是不同的。可以进入一个容器在容器中进行操作,也可以开启一个容器让其后台运行为我们提供相应的服务。
- 使用镜像创建一个容器
bash
# 以 centos 镜像(以终端交互的方式)启动一个容器
# 参数说明: -i 交互式操作,-t 终端,centos 镜像名称,/bin/bash 镜像运行以后执行的命令 打开终端
docker run -it centos /bin/bashyaml
[root@iZ2ze5ghrqruon2g1ow1buZ docker]# docker run -it centos /bin/bash
Unable to find image 'centos:latest' locally
latest: Pulling from library/centos
7a0437f04f83: Pull complete
Digest: sha256:5528e8b1b1719d34604c87e11dcd1c0a20bedf46e83b5632cdeac91b8c04efc1
Status: Downloaded newer image for centos:latest
# 这个时候就进入了容器,因为容器中没有安装docker,这里报错
[root@c758fc63d1bd /]# docker ps
bash: docker: command not found
[root@c758fc63d1bd /]# exit
exit- 还可以在后台开启一个容器,让容器给我们提供web服务
bash
# 不同镜像的用户是不一样的,启动镜像的参数也不同
# docker run 基于镜像启动一个容器
# 参数说明:-d 后台运行
#           --name nginx-server 给容器起名字为nginx-server,可以通过名字找到容器,也可以通过名称关闭容器或删除
#           -p 映射容器中的端口,宿主机端口:容器端口
#           nginx 镜像名称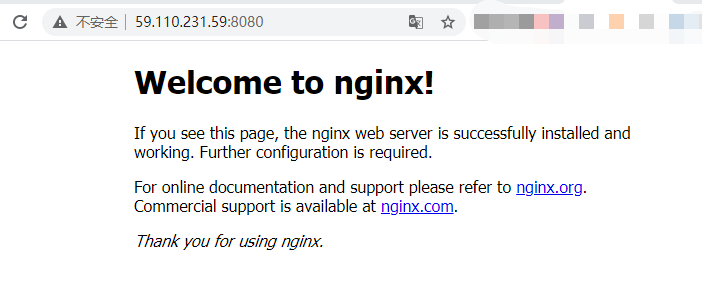
docker run -d --name nginx-server -p 8080:80 nginx可以看到开启了8080端口
bash
[root@iZ2ze5ghrqruon2g1ow1buZ docker]# docker ps
CONTAINER ID   IMAGE               COMMAND                  CREATED         STATUS         PORTS
    NAMES
f170dd92b93e   nginx               "/docker-entrypoint.…"   6 seconds ago   Up 5 seconds   0.0.0.0:8080->80/tcp
    nginx-server
18a1c1f174fa jayfong/yapi:play "docker-entrypoint.s…" 4 hours ago Up 4 hours 0.0.0.0:40001->3000/tcp clever_mccarthy通过8080端口可以访问这个服务。
查看容器
查看正在运行的容器
bash
docker psbash
[root@iZ2ze5ghrqruon2g1ow1buZ docker]# docker ps
CONTAINER ID   IMAGE               COMMAND                  CREATED         STATUS         PORTS                     NAMES
f170dd92b93e   nginx               "/docker-entrypoint.…"   6 seconds ago   Up 5 seconds   0.0.0.0:8080->80/tcp      nginx-server
18a1c1f174fa jayfong/yapi:play "docker-entrypoint.s…" 4 hours ago Up 4 hours 0.0.0.0:40001->3000/tcp clever_mccarthy查看所有的容器
包括已经运行的和没有运行的容器
bash
docker ps -abash
# CONTAINER ID 容器唯一标识
# IMAGE 容器是基于哪个镜像创建的
# COMMAND   容器中的什么命令
# CREATED 容器创建的时间
# STATUS 容器的状态,Exited..是退出了,或者运行了多长时间
# PORTS 是端口映射
# NAMES 容器名称

[root@iZ2ze5ghrqruon2g1ow1buZ docker]# docker ps -a
CONTAINER ID   IMAGE               COMMAND                  CREATED          STATUS                       PORTS                     NAMES
f170dd92b93e   nginx               "/docker-entrypoint.…"   5 minutes ago    Up 5 minutes                 0.0.0.0:8080->80/tcp      nginx-server
c758fc63d1bd   centos              "/bin/bash"              12 minutes ago   Exited (127) 8 minutes ago                             recursing_williamson
7bcf6b1a9855   hello-world         "/hello"                 4 hours ago      Exited (0) 4 hours ago                                 vigilant_euclid
18a1c1f174fa   jayfong/yapi:play   "docker-entrypoint.s…"   5 hours ago      Up 5 hours                   0.0.0.0:40001->3000/tcp   clever_mccarthy
7c897164520e   nginx               "/docker-entrypoint.…"   5 hours ago      Exited (0) 5 hours ago                                 nginx-test
9b4c08b6312a hello-world "/hello" 5 hours ago Exited (0) 5 hours ago frosty_kalam查看运行中容器的状态
bash
# 查看运行中容器的状态
docker statsbash
# CPU % 消耗了多少cpu
# MEM USAGE / LIMIT 消耗了多少内存
# NET I/O 网络操作
CONTAINER ID   NAME              CPU %     MEM USAGE / LIMIT     MEM %     NET I/O           BLOCK I/O         PIDS
f170dd92b93e   nginx-server      0.00%     8.148MiB / 1.784GiB   0.45%     8.52kB / 7.65kB   11.7MB / 7.17kB   2
18a1c1f174fa clever_mccarthy 0.45% 90.07MiB / 1.784GiB 4.93% 49.5kB / 2.65MB 45MB / 2.33MB 36安装 yapi
https://hub.docker.com/r/jayfong/yapi
bash
docker run --rm -d -p 40001:3000 jayfong/yapi:play
# 默认的管理员账号:admin@docker.yapi,管理员密码:adm1n。安装 nginx 镜像
https://www.runoob.com/docker/docker-install-nginx.html
常用 Docker 命令
基本命令
bash
# 查看所有容器
# 不加参数 -a 查看所有运行中的容器
docker ps -a

# 查看运行中容器的状态
docker stats

# 启动容器,参数可以是容器id,或者容器名称
docker start nginx-server

# 停止、重启、删除容器
docker stop nginx-serve
docker restart nginx-serve
docker rm -f nginx-serve

# 清理所有终止的容器
docker container prune

# 进入容器
docker exec -it nginx-server /bin/bash

# 查看容器内部的日志
# 不加 -f 是打印当前日志,加了-f是一直监听日志
docker logs -f nginx-server导入和导出容器
bash
# 导出容器,导出容器的快照文件
docker export nginx-server > nginx-server.tar

# 导入容器快照 - 从快照文件中导入镜像  mynginx 镜像名称,v1 镜像的 tag
cat docker/nginx-server.tar | docker import - mynginx:v1镜像操作
bash
# 使用镜像开启一个容器,并进入容器 -it 交互式终端操作
docker run -it nginx /bin/bash
# 使用镜像开启一个容器, 后台运行
# 参数说明:--name nginx-test 容器名字  -p 端口映射  -d nginx 后台运行镜像名字
docker run --name nginx-test -p 8080:80 -d nginx
# 镜像删除
docker rmi nginx:test容器操作
bash
# 在容器中执行命令
docker exec -it nginx-test /bin/bash
# 启动停止
docker start bb0d52be2f81
docker stop bb0d52be2f81
# 删除
docker rm bb0d52be2f81

# 清理所有终止的容器
docker container prune容器部署 Vue.js 项目
基于docker部署vue
https://cn.vuejs.org/v2/cookbook/dockerize-vuejs-app.html
- 在vue项目中创建Dockerfile,里面写
bash
# build stage
FROM node:lts-alpine as build-stage
WORKDIR /app
COPY package*.json ./
RUN npm install --registry=https://registry.npm.taobao.org
COPY . .
RUN npm run build

# production stage
FROM nginx:stable-alpine as production-stage
COPY --from=build-stage /app/dist /usr/share/nginx/html
EXPOSE 80
CMD ["nginx", "-g", "daemon off;"]Dockerfile
- https://docs.docker.com/engine/reference/builder/
- 创建 Docker 镜像
- Docker 镜像的配置文件
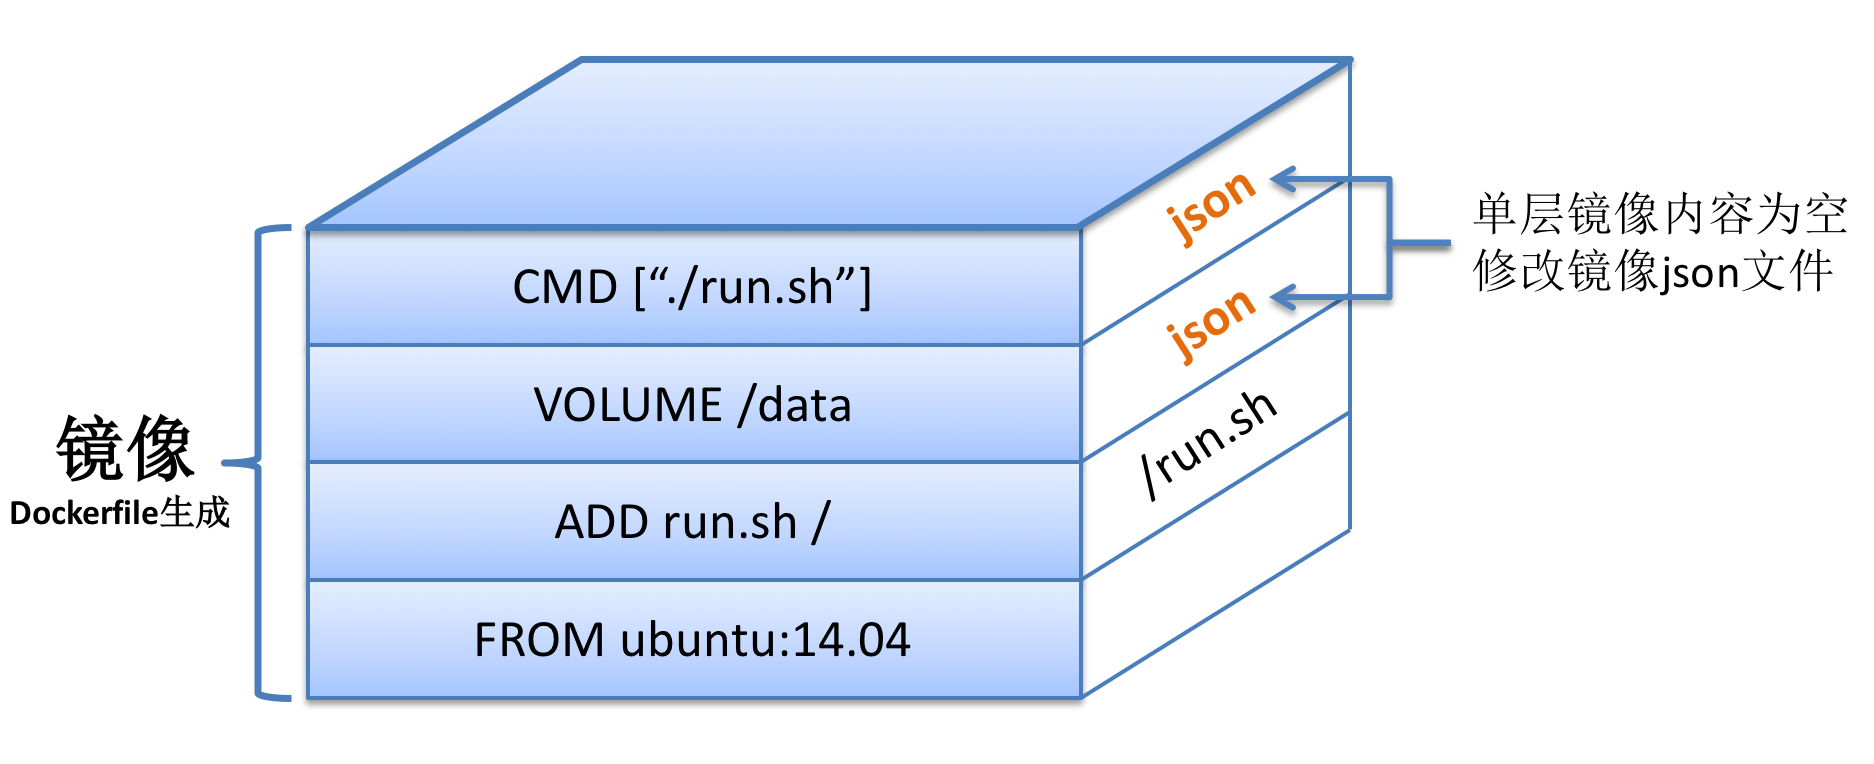
- Dockerfile
dockerfile
# build stage
FROM node:lts-alpine as build-stage
WORKDIR /app
COPY package*.json ./
RUN npm install https://registry.npm.taobao.org
COPY . .
RUN npm run build

# production stage
FROM nginx:stable-alpine as production-stage
COPY --from=build-stage /app/dist /usr/share/nginx/html
EXPOSE 80
CMD ["nginx", "-g", "daemon off;"]- 使用 Dockerfile
bash
docker build --rm -t deploy-web:v1.0 .
# 编译过程中如果遇到 npm install 的时候无法解析 npm 的地址,可以使用宿主机的 network
docker network ls
docker build --network host --rm -t deploy-web:v1.0 .
# 开启容器
docker run -itd --name web -p 88:80 deploy-web:v1.0- 在浏览器中测试
Docker Hub
- 私有仓库 Harbor
- 公共仓库 https://hub.docker.com/
- 首先登陆到 Docker Hub
bash
docker login
# 从容器创建一个新的镜像
docker commit a6a685eb4ba1 goddlts/web:v1.1
# 镜像上传到 hub
docker push goddlts/web映射配置目录和网站根目录
- 映射配置目录和网站根目录
bash
# 复制之前容器中的 nginx 配置文件,把容器中的配置目录nginx拷贝到当前目录下
docker cp web:/etc/nginx .bash
docker run -itd \
  --name web-web \
  --volume /home/mypro:/usr/share/nginx/html \
  --volume /home/nginx:/etc/nginx \
  -p 89:80 \
deploy-web:v1.0bash
# 更改权限
chmod -R 777 .Gitlab
安装
- https://about.gitlab.com/install/
- https://docs.gitlab.com/omnibus/docker/
- https://hub.docker.com/r/gitlab/gitlab-ce
bash
docker run --detach \
	--hostname 192.168.137.22 \
  --publish 13880:80 --publish 13822:22 \
  --name gitlab \
  --restart always \
gitlab/gitlab-ce:latestbash
docker exec -it gitlab /bin/bash

mkdir /home/gitlab/config
mkdir /home/gitlab/logs
mkdir /home/gitlab/data

# 提升权限
chmod 777 configbash
docker run --detach \
	--hostname 192.168.137.22 \
  --publish 13880:80 --publish 13822:22 \
  --name gitlab \
  --restart always \
  -v /home/gitlab/config:/etc/gitlab -v /home/gitlab/logs:/var/log/gitlab -v /home/gitlab/data:/var/opt/gitlab \
  gitlab/gitlab-ce:latest

docker run --detach \
  --hostname lfz.com \
  --publish 13880:80 --publish 13822:22 \
  --name gitlab \
  --restart always \
  -v /backup/gitlab/config:/etc/gitlab -v /backup/gitlab/logs:/var/log/gitlab -v /backup/gitlab/data:/var/opt/gitlab \
  gitlab/gitlab-ce:latest

# 防火墙允许端口
firewall-cmd --add-port=13880/tcp --permanent
firewall-cmd --reload

docker logs -f gitlab通过浏览器访问,修改中文界面
- http://192.168.137.128:13880/
- 点击右上角头像 - Settings - Preferences - Localization - Language - Save Changes - 刷新浏览器
修改 gitlab 显示的端口
bash
vi /home/gitlab/config/gitlab.rbbash
external_url 'http://192.168.137.128:13880'
nginx['listen_port'] = 80
gitlab_rails['gitlab_shell_ssh_port'] = 13822bash
docker restart gitlabJenkins
bash
# 下载镜像
docker pull jenkins/jenkins
# 创建容器 1
docker run -itd --name jenkins --net host --restart always -p 8080:8080 -p 50000:50000 jenkins/jenkins


docker run -itd --name jenkins --restart always -p 8080:8080 -p 50000:50000 jenkins/jenkinsbash
# 查看 jenkins 默认管理员的密码
docker logs -f jenkins

# 36f11bfeab664931b463a2047fb3e395

# 开启端口 8080
firewall-cmd --add-port=8080/tcp --permanent
firewall-cmd --reload
# 关闭防火墙
systemctl stop firewalld- 重新创建 Jenkins
bash
# 拷贝 Jenkins 的数据到 宿主机
docker cp jenkins:/var/jenkins_home /home/

# 创建容器 2
docker run -itd \
	--name jenkins \
  --user jenkins \
  --net host \
  --restart always \
  -p 8080:8080 -p 50000:50000 \
  -v /home/jenkins_home:/var/jenkins_home \
  -v /usr/bin/docker:/usr/bin/docker \
  -v /var/run/docker.sock:/var/run/docker.sock \
  jenkins/jenkins


# 宿主机
cd /home/jenkins_home
chmod -R 777 .
chmod -R 777 /usr/bin/docker
chmod -R 777 /var/run/docker.sockJenkins 插件
- https://plugins.jenkins.io/
- Jenkins 插件加速
- Jenkins 配置加速地址
- Manage Jenkins --> Manage Plugins --> Advanced --> Update Site
- https://mirrors.tuna.tsinghua.edu.cn/jenkins/updates/update-center.json
- 安装常用插件
- 权限管理插件
持续集成配置
Jenkins
- Jenkins 中配置 Gitlab 的权限
- 系统管理 -> 全局安全配置
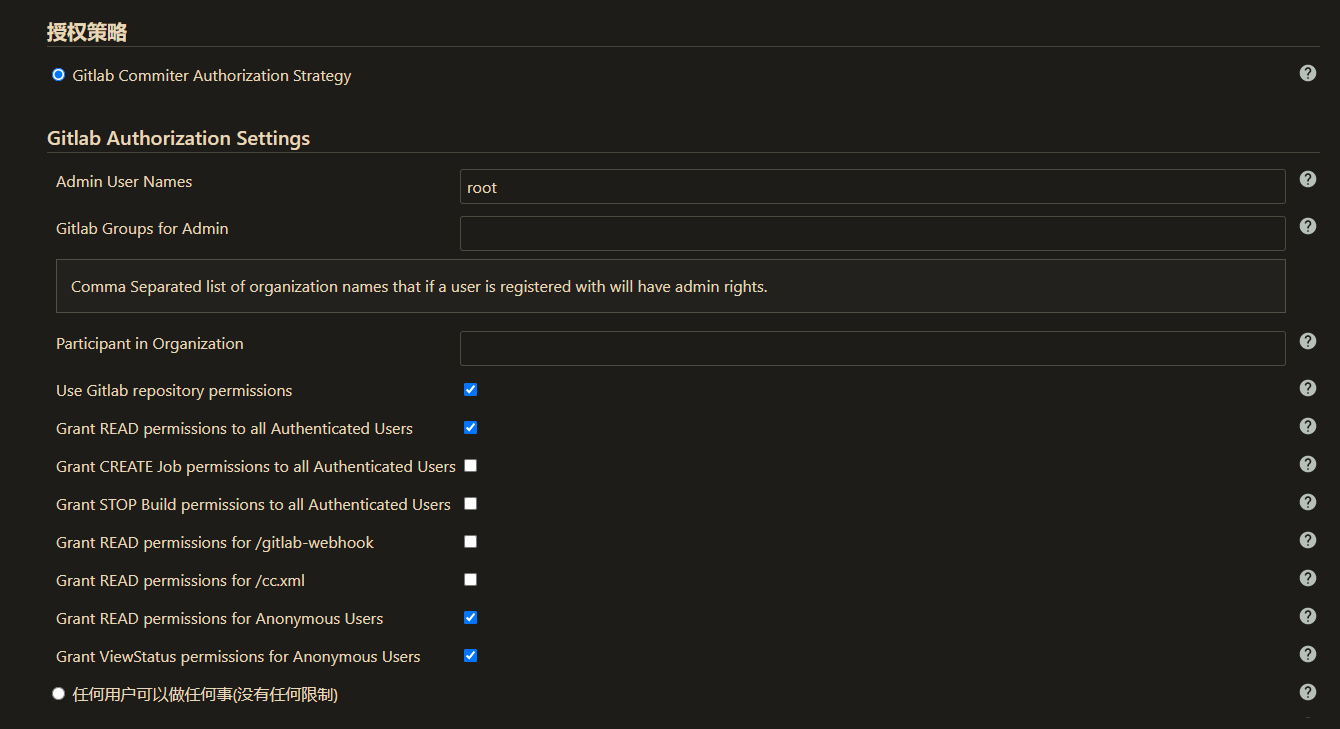
- Gitlab 中创建应用之后填写

- 设置好之后,先应用再保存!!!!!!血的教训
Gitlab
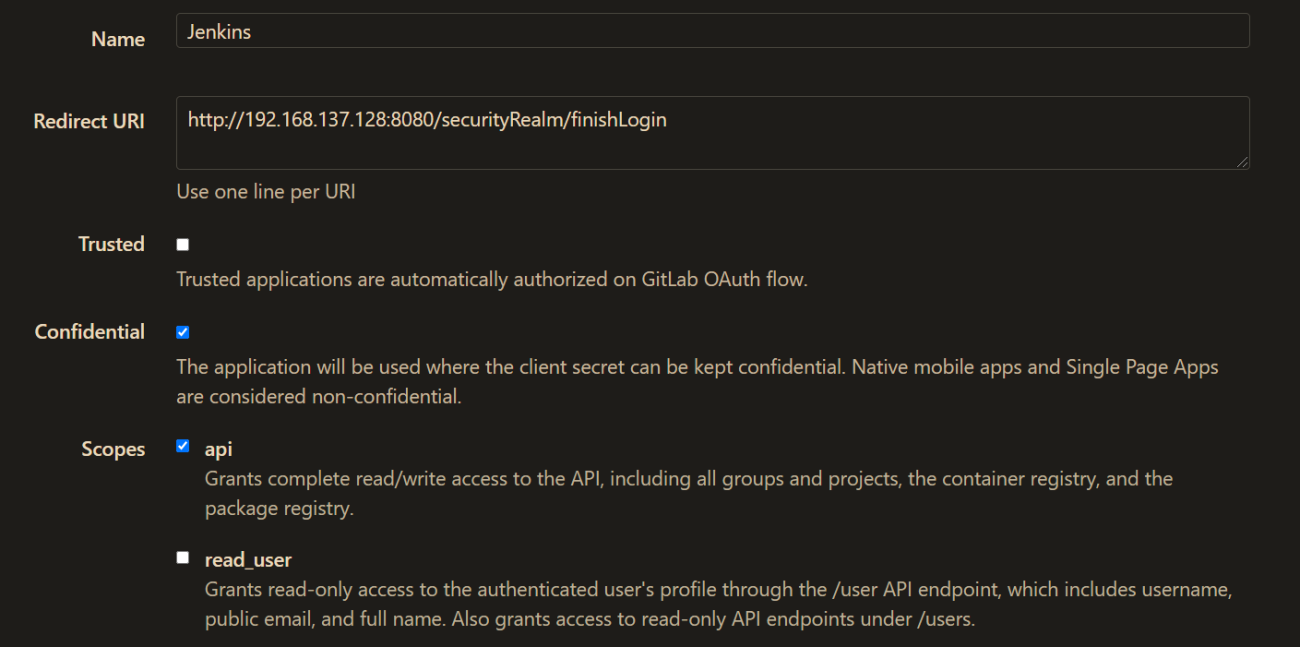
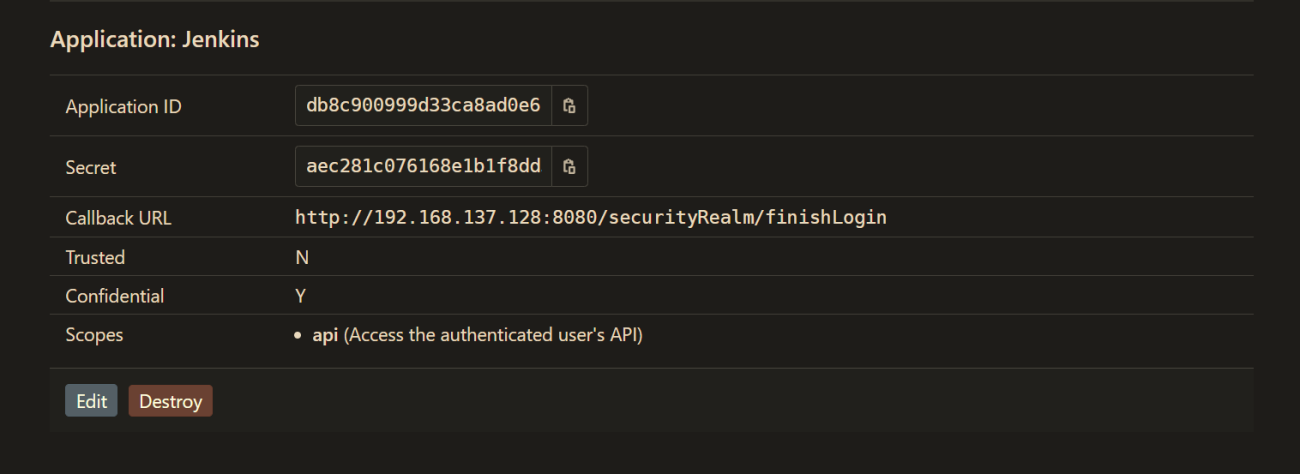
- 配置 Jenkins 回调地址
- 查看回调地址如何写:https://plugins.jenkins.io/gitlab-oauth/
- 管理面板 -> Applications -> New Application
- http://192.168.137.128:8080/securityRealm/finishLogin
允许外发请求
- 管理面板 -> Settings -> Network -> Outbound requests ->
- Allow requests to the local network from web hooks and services
- 管理面板 -> Settings -> Network -> Outbound requests ->
Gitlab 新建仓库,把本地仓库推送过来
Jenkins 中新建任务
- 配置 git 地址,和凭证
- 构建触发器,当 push 当 gitlab 执行脚本
- GitLab webhook URL: http://192.168.137.128:8080/project/mypro
- 高级中生成 Secret token
- 8ecbbcb6dad150467cc48906940052f4
- 构建中设置要执行的脚本
bash
# 判断是否存在 myprocon 容器
docker ps | grep myprocon &> /dev/null
if [ $? -eq 0 ]
then
	docker rm -f myprocon
fi

docker build -t mypro:v1.0 .
docker run -itd --name myprocon -p 89:80 mypro:v1.0- Gitlab 的想要应用这个任务的仓库中
- 仓库的 Settings -> Webhooks
- 配置 Jenkins 中的 webhook URL
- 配置 Jenkins 中的 token
- 去掉 SSL 验证
- 点击添加 add webhook
- 最下面添加的 webhook 中可以点击 Test 触发 push
- 仓库的 Settings -> Webhooks
关闭防火墙(解决容器内无法解析DNS)
- 关闭容器防火墙
- 重启 docker
bash
# 关闭防火墙
systemctl stop firewalld
# 开机禁用
systemctl disable firewalld
# 开机启用
systemctl enable firewalld
# 重启 docker
systemctl restart dockerDocker compose
bash
web:
  image: 'gitlab/gitlab-ce:latest'
  restart: always
  hostname: 'gitlab.example.com'
  environment:
    GITLAB_OMNIBUS_CONFIG: |
      external_url 'https://gitlab.example.com'
      # Add any other gitlab.rb configuration here, each on its own line
  ports:
    - '80:80'
    - '443:443'
    - '22:22'
  volumes:
    - '/srv/gitlab/config:/etc/gitlab'
    - '/srv/gitlab/logs:/var/log/gitlab'
- '/srv/gitlab/data:/var/opt/gitlab'docker-compose 方便快速运行多个容器
使用一个命令,从 YML 配置文件创建并启动所有容器
安装
- 获取 Docker compose 的最新版本,文档中会有安装说明
bash
# 下载最新的稳定版本
curl -L https://github.com/docker/compose/releases/download/1.25.4/docker-compose-`uname -s`-`uname -m` -o /usr/local/bin/docker-compose

# 授予 docker-compose 可执行
chmod +x /usr/local/bin/docker-compose

# 测试安装是否成功
docker-compose --versionbash
# 开启容器
docker-compose up -d